General
What is a printable template?
Printable templates are digital PDF files, ready to print on your home printer or at a professional printing service.
Software Requirements
Do I need any special software?
All you need is the FREE Adobe Reader on your computer! Most computers will already have this installed but check that you are using one of the latest versions.
The latest version is called "Adobe Acrobat Reader DC" and you can download (or update your earlier version) for FREE quickly and easily here: http://adobe.com/go/reader.
Some resources are more than one file. In cases like this the files may be packed together in a zip-file. To open a zip file you need to unzip it first
Please look here for more help on how to unzip: www.wikihow.com/Unzip-a-File.
Printing and Paper
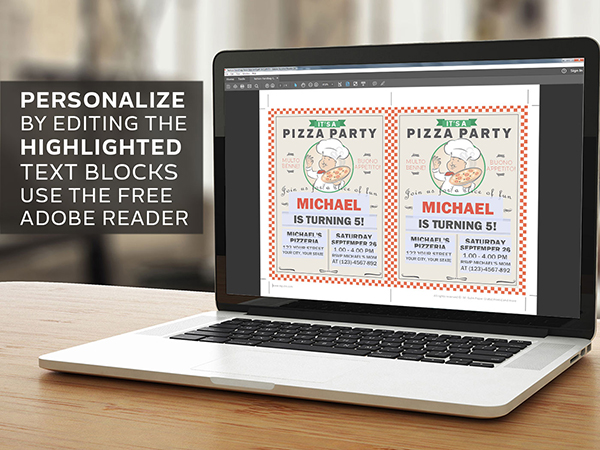
How do I edit and customize the text on the PDF-files for example Invitations?
Step 1. Open File
Open the file you want to edit i Adobe Acrobat Reader (if you don't already have the free software you can download it here; http://adobe.com/go/reader).
Step 2. Edit Text
Editable text fields are hightlighted. Choose the field you want to edit and type your text.
Step 3. Save & Print
When saving rename the the PDF file. Now print as many copies you want.
How do I print the templates?
My printable templates are designed to print at home on your color printer.
What kind of paper should I use?
Templates are formatted for A4 sized paper but print perfectly on US Letter sized paper (8.5 x 11 inches) sized paper too.
I recommend printing on heavyweight Matte Photo Paper for best results. If that is out of your budget, choose a bright white Cardstock.
Will the template print exactly the same color that I see on my computer?
Generally you will see slight variations in the color of your printed template from what you can see on your computer screen.
This is because not only do the colors vary from monitor to monitor, but will also vary depending on the type of paper you choose, your printer and your printer settings.
Cutting and Assembling
What supplies will I need to cut and assemble the templates?
To assemble my templates generally all you need is:
- a printer
- paper
- scissors
- some type of paper glue.
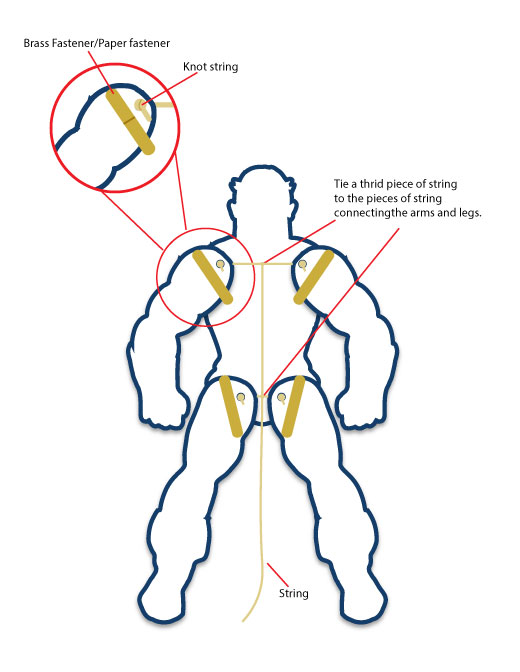
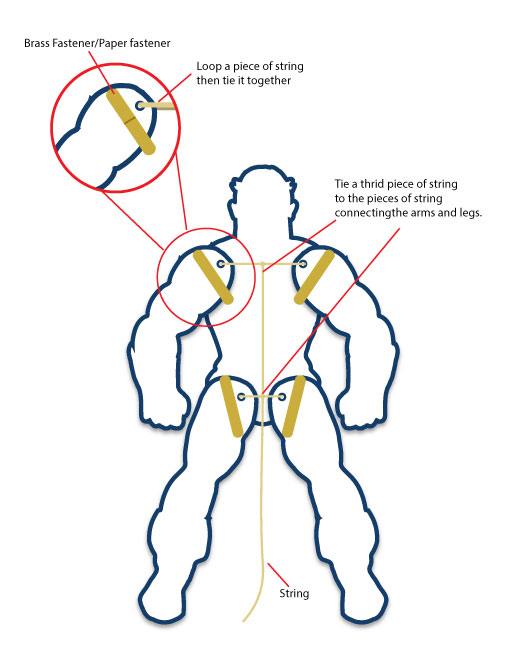
How do I thread the superhero puppets or how do I make it into a jumping jack/string puppet?
To make a jumping jack or string puppet, you need to slide a piece of string through the holes you made in the small white circles on the arms and legs (the larger circles are for the fasteners). You can either make a small knot to keep the string in place or loop the string and tie the arms together. Repeat this process for the legs. Then take a longer piece of string and tie it to the to pieces of string connecting the arms and legs. Check out the images below for more details. Images are showing the back of the paper puppet.
With a knot
With a loop
Terms of Use
Can I forward the templates to my friends and family?
Please respect the time & effort it takes to create my templates and do not distribute the files to friends or family. I would love you to refer them to my website instead.
Can I resell your printable templates?
Commercial use and mass production are not permitted. You cannot resell my printable templates or the finished products.
Please see my full Terms of Use for more details
I am a Party Planner, can I buy your templates to use for my clients?
My printable templates are for PERSONAL use only. Please do not purchase my templates for use in your party planning business.
You can see my full Terms of Use for more details.
I'm a teacher or educator, can I use your templates in class?
I encourage the use of my templates for educational or creative purposes. So feel free to use them in class. But please add a reference to my website.
Privacy Policy
What is this websites privacy policy
Read more about our privacy policy